Canning 101: Everything You Need to Get Started Canning | This comprehensive post shares what tools are a must-have, which ones you can skip, and what you can add to your wish list.
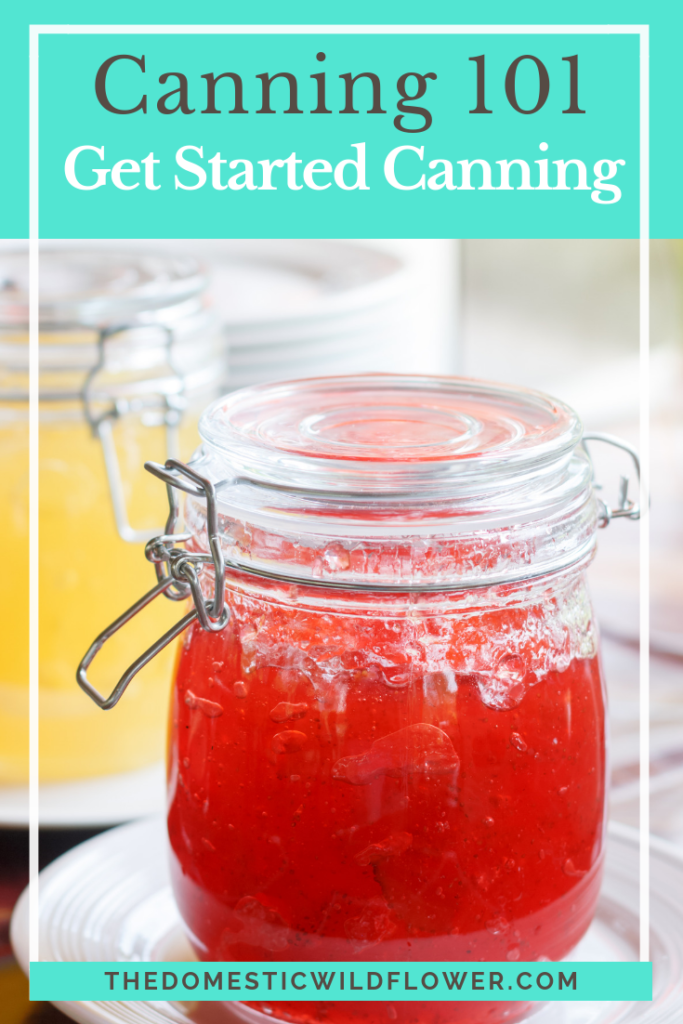
Getting started canning can seem totally overwhelming because you need fairly specific equipment and it is really hard to know what to invest in, what you can skip, and what is a necessity. I am here to explain all the stuff you must have, the tools that are handy but not necessary, and what you can wait a while to get your hands on. This post will explain everything you need to get started water bath canning and includes affiliate links to Amazon (my online shopping fave) should you want to start adding goodies to your cart and get started canning stat. If you think you have all the tools you need, this post shares what in the world you need all the pots for. If you have canned a time or two, scroll down to where I share my canning resources including the Acid & Canning Guide and the link to the ebook I’m so excited about. Happy reading, Wildflowers!
This post contains affiliate links. All opinions remain my own and I would never suggest a product I don’t own myself or would recommend to my Grandmother, the nicest lady in the world.

The first thing you need to begin canning is a canning pot. These are often the black with white speckled enamel pots that are really large and are frequently sold with a wire rack inside. You don’t have to have a huge pot like this, and if you are a single person or a small family (read: not canning to feed a small army) a pasta pot will work just fine. In fact, I’d use whatever pot you can borrow or already own until you make your first batch or two before you make the investment. A large pot takes up a lot of cupboard space and in my tiny house, that is pretty important. The pot will need to be taller than the tallest jar you plan on processing (that means sticking inside the pot, upright) by at least 3 inches. I have a pasta pot that is shorter than the standard quart jar, so I just can pints in it. The beauty of a smaller pot is a shorter time for the water to boil which can be very helpful indeed. Your pot doesn’t need a lid, though the water will come to a boil faster if you do.

In the pot you will need either a rack made of wire or a silicone trivet. Both keep the bottom of the jars off the bottom of the pot. This is not an optional piece of equipment. A jar will break inside the pot, much to your dismay, almost guaranteed if you don’t. The silicone trivet is nice because it can be used as a hot pad when you are serving a hot dish on the supper table, and they come in all kinds of colors. The wire rack is an obvious choice when it comes already inside the canning pot as they are frequently sold together. I use the exact silicone trivet below and I like it because the surface where the jar sits is flat. If it were rounded, the jars would/could slip and be leaning awkwardly in the water and are harder to remove. It sounds like a tiny detail but wrestling jars out of boiling water are no fun. Look for one that has a flat surface on which to rest your jars.

You need a preserving pan. This is the pot/pan you will cook the fruit or vegetable in before you pour it into the hot jars. It can be similar to the water bath pot, but it would likely be a pan you already own that is heavier bottomed (less chance of scorching your jam or salsa) and can have lower sides. That means it does NOT have to be taller than the jars you will be filling with homemade goodness. It can look like the one below that was kindly gifted to me for my wedding.

You need canning jars. You don’t want glass mayonnaise jars that look very similar that are often found in garage sales, nor do you want a reused store-bought pasta sauce jar. You need canning jars that are specifically created to withstand the heat of water bath canning. They don’t need to be new either. Jars can be reused over and over for years. You should check the rims and the jars themselves carefully for cracks or chips. There’s nothing quite like the disappointment of filling a jar with delicious, hot jam, putting it in the water bath of boiling water, only to see the bottom fall out of the jar and your effort and fruit wasted.

I absolutely have purchased jars online and never had one arrive broken but it is a legitimate concern. I honestly have scored most of my jars from yard sales and from relatives. The links below are for the sizes that I think are the most useful for someone getting started canning. The jars marked as safe to freeze are a double win because you can freeze food in them safely also. There’s a handy fill line so you know you won’t crack the jar. The tall wide mouth jars are a pint and a half (3 cups) and are good for pickled asparagus, tall dilly beans, juice, and are my favorite for drinking. The quilted side jam jars are the right quantity for gifting and are totally useful beyond canning for food & dry goods storage.


One thing that I love about canning jars, lids, and rings is that they come in two mouth sizes: regular and wide. That’s it. The opening of any regular canning jar will fit every regular lid and regular ring and the same goes for the wide. They are NOT like the plastic sandwich container lids that are the bane of every homemaker’s cupboard, only fitting one particular bottom.
It doesn’t matter which opening you choose. It is a matter of personal preference and if you are just getting started, I’d buy what is most readily available or easy to borrow or purchase for cheap.
The size of the jar depends on the type of preserve you plan on making. I like wide mouth pints for everything. A pint jar holds 2 cups, and that is about enough pasta sauce for 2 suppers, not so much jam that it would go bad before my family eats it, and can double as a drinking class.
You need rings. They can be used but they should not be rusted. Save the rusted ones for a cute home decor project but get rust-free, dent-free, clean rings. New jars come with lids and rings but are often found/sold separately too.

You need NEW lids. The seal that is created from the lid on the rubber flange is only good (read: safe) for one trip through the canning pot. After that is it useful for storing dry goods, crayons, etc, but not for canning. Often time the rings and lids are sold together, but unless you need rings, you just need lids. You need lids season after season as they are only good for one use, and rings are usable year after year.

You need tools to put the hot food into the hot jars. A utensil kit may seem unnecessary but I will tell you that they are very valuable. A kit usually contains a funnel, a magnetized lid lifter, and a tong-like jar lifter. A funnel is necessary for pouring your boiling hot food into the very hot jar. A splash or drip on the rim of the jar could mean a seal won’t be created which would mean you’d need to eat that jar up soon and store in the fridge. The link below features a little tool that helps with two things. Its jagged edge helps remove bubbles from your food before processing and it helps to measure the headspace (the room between the food and the lid). I don’t have one but they are helpful especially if you aren’t great at eyeballing inch measurements.

You need a way to get the hot jars out of the boiling water and back in the boiling water. There have been times that for whatever silly reason I couldn’t find my jar lifter when I needed to and I tried to improvise by wrapping rubber bands around some tongs I had and while it sort of worked, it was slippery and dangerous and can attest to the fact that a boiling water burn is no joke. I haven’t misplaced my lifter since.
The magnetized lid lifter isn’t necessarily exactly but it is a very handy tool. You need a way to get the hot lids out of the hot water and onto the jars in a quick fashion and this little lifter does exactly that. I store mine with my jar lifter and they make the hot, fun work of canning faster and safer.
A ladle is very, very handy and while I wouldn’t say it is an absolute necessity if you don’t have one you need a long-handled spoon. A ladle eliminates a lot of spilling, in my experience, and results in more food ending up in the jar and less on the floor. I like the one below because it hangs on the edge of the pot (rather than sliding down into hot jam lava) and it is stainless steel rather than melt-able plastic.

You need a canning book. A recipe card from Great Aunt Sally or from your favorite canning blogger like yours truly is a good start, but you need an up to date canning book published by a reputable source. The first couple of chapters in any good canning book outlines in great detail, with photographs, safe water bath canning practice. By reading those chapters, you will have a clear idea of why canning is a safe way of preserving food and what you need to do to ensure canning success. Here are the books that I love:


If you get the ‘safe’ part right (which is very simple to do!) the worst case scenario is a jam that is too thin and is better used as syrup. Seriously, that’s the worst thing that could happen; that the yummy thing you were hoping to make isn’t as amazing as you planned. Isn’t that the risk we all run while cooking a new recipe for supper? Get a book. Here are the books that I love and use year round.
Does that seem like a GIANT list? Print your free shopping list here!
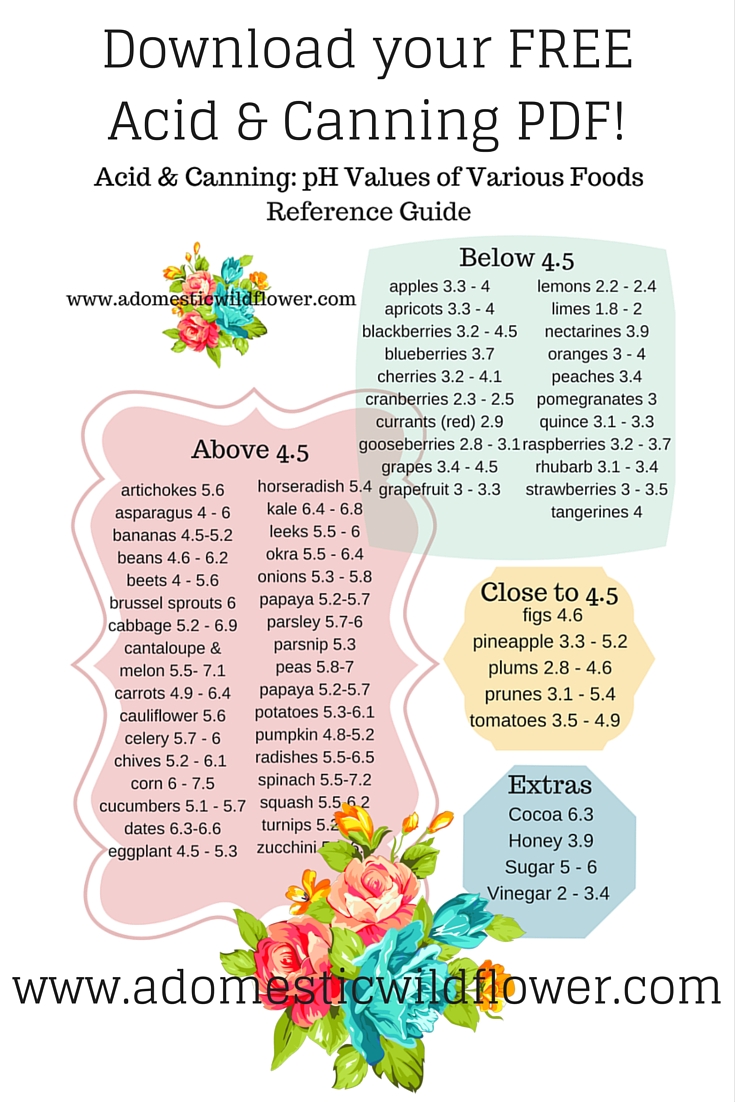
Canning safety is the biggest reason I hear people say is preventing them from trying it. Because of this fear, I did some research and created a free PDF listing the pH values of foods a person would potentially want to can and wrote a post about acid & canning here. The post explains that by canning food that is high enough in acid, you create an environment that is too acidic for spoilers (bugs that make you sick) to live. Period. Please head to my post to grab your free PDF and stick it inside the front cover of the above-mentioned book. That way you’ll feel confident that the delicious food you are putting up will be safe.
PDF Download Acid & Canning Guide: pH Values of Various Foods by A Domestic Wildflower. Click to access this super helpful list of foods and their acid values and start canning with your mind at ease. This list is easy to read and is sorted by acid level so you will know when substitutions are safe, and when it is best to follow a trusted recipe! Download it today!
So if you have read the above list and are wondering what the heck you need all this stuff out on your stove for, here’s the basic process in canning. You put jars in the big pot and fill with water and bring it to a boil. You have the lids and rings in the saucepan simmering on the stove also. In the third pot you cook your jam or salsa or whatever your heart desires to preserve. When the food is boiling (and you have followed all the directions in the recipe) you remove the hot jars one by one and dump the water back into the pot. The hot food is then ladled into the hot jars. The hot lids and rings get screwed on and you quickly put the hot, food-filled jars back in the boiling water and let them sit in the boiling water for a recipe-specified time. The last step in removing the hot jars carefully and setting them on a towel on the countertop. Hot food into hot jars into hot water and back out again. That’s it!
The last thing you need can’t be purchased. You need a mentor. Someone who loves canning will tell you what you need to know and encourage you which I find is the most important thing in getting started. Find someone who has canned before and asked them how they did it, what they made, the tools they liked or didn’t and why, and any lessons they learned the hard way.
I love teaching others how to can because canning seems to have this strange mystique about it where folks on the outside see canners as tackling food chemistry and taming lions at the same time. Once I show someone how to can, the general comment is, “Oh, that’s not that hard.” Nope. It isn’t hard at all. True, the boiling water is hot, and if you have a kitchen the size of a tissue box like me, it can be a cramped and sweaty afternoon at the stove but the results are so worth it and it can be a really fun thing to do with a friend. I have very fond memories of peeling slippery, slimy tomatoes with my dear friend as fast as we could, sitting together at my kitchen table, and trying to can them at lightning speed before my new baby woke up. We sipped a cold beer and chatted in low tones, reaffirming one another that it was indeed a good idea to buy soooooo many pounds of tomatoes with so little time and room to process them. We got almost done before the baby woke up, had a great time together, and she left with pints upon pints of tomato sauce and headed home for a shower. If that isn’t good clean grown-up fun, I don’t know what is.
I hope you find this guide is not only comprehensive but encouraging. Get a couple of pots and some jars, get a book, and get started Wildflowers!
If you want to learn how to apply all this, enroll in the completely free canning basics course where I teach process, equipment, and safety!
Sign up here!
If you want to see some canning in action, head to my YouTube Channel; I have lots of videos of me canning things like tomato sauce, grape jam, and roasted bell peppers.
Whew! I know that is a lot of info, Dear Readers, but I wanted to be totally thorough so you’d feel confident getting all those pots of water and goodness boiling on the stove. If you ever have questions, please feel free to leave a comment here or email me directly at jenny@thedomesticwildflower.com ~ I’m here to help!

Leave a Reply